Monday, December 31, 2012

Trend Alert - Diamond Quilted Pattern in Home Decor

It is only a few hours from the start of the New Year.  So I thought it would be fun to look ahead at one of the home décor trends you can expect to see in 2013.  This diamond quilted pattern was made popular during the Art Deco/Depression Era of the early 1930's.  It was especially prominent in the glassware patterns of the day.  Like many things old it is new again.  Let's take a look at some ways you can incorporate the trend into your home.


Ralph Lauren Suite Diamond Quilted Sateen Bedding - The Home Decorating Company $299.99


Christopher Knight Home Mandolin Grey Leather Quilted Chair - Overstock.com   $202.49
Belmont Crystal 8 oz. High Ball Glasses - DineNDecor.com  Set of 4 for $34.25
 
Modern Mojo Accent Chest - Cymax.com  $900.90


Alliance Always Mine II Carpeting - Shaw Floors $3.50 - $3.99 sf
  
GUS* Thatcher Sofa - 2modern.com $1,999.00


If you want to add the diamond quilted trend to your home in a smaller way, check out Ebay for something truly vintage.  The bud vase below hits more than one trend as it is Emerald Green which is Pantone's 2013 color of the year.

 
Vintage E.O. Brody Emerald Green Bud Vase - Ebay.com $17.99
 
 
So what do you think?  Will you be adding diamond quilting in your home somewhere?


Sunday, December 16, 2012

Make A Simple and Rustic Snowflake Garland


It was a tough day today.  A day of profound mourning for the 26 people killed at Sandy Hook Elementary School in Newtown, Connecticut on Friday.  Twenty of them 6 and 7 year old little angels.  I was born and raised in Shelton only about twenty minutes from the sight of this horrific event.  With a lump in my throat today I made this simple winter garland for my stairway banister.


I started the process by hanging the holographic snowflakes I purchased at Michael's Craft Store on my clothes line.  They came in a package of 4 for a $1.00.  I then spray painted them with diamond dust Krylon Glitter Blast glitter spray to give them more of a snowy texture.


I tied one end of the burlap garland I purchased in a 10 yd. roll at Michael's to the top post.


I weaved the burlap in and out of each rail.


I then cut the burlap to the length needed and tied the second end to the bottom post.


I first began gluing the snowflakes to the burlap using my glue gun, but I found that they weren't sticking as well as I would have liked.  To insure that the  snowflakes stayed put, I chose instead to tie them to the burlap using white garbage bag ties.  With the small holes in the burlap material, it was easy to thread the ties in and then through the small hole in the top of each snowflake to secure them.

I think the final product in its simplicity and sparkle is fitting.  It will always bring to mind for me those little angels and their teachers who left this world far too soon. 


Wednesday, December 5, 2012

Make an Elegant Christmas Centerpiece


It is fun to take interesting items and turn them into something even more interesting.  I started with a what I was told was a cupcake holder.  To be honest that is not what I saw when I spotted it on a shelf at the Goodwill Store.


I wanted my theme to be elegant and wintry so I started by spray painting the cupcake holder white.  I also inserted a glass Christmas tree I had into the center.


I then added votive candleholders to each cup holder.  I had six around the house and had to purchase an additional six to fill each spot.


To glam things up even more I added Crystal drops I found at Michael's.  I added one to each candle location by sliding it onto the open wire end.


The final product looks like a modern candle tree.


To pull the whole tablescape together, I covered my table with a white table runner embellished with silver threaded flower petals I found at Homegoods.  To set my table I used silver chargers and white plates that I already had.  I added glass stemware that I had purchased over time at the Salvation Army Thrift Store to each place setting.   The silver napkins I purchased new from Homegoods.  For the final touch of bling I added burgundy red beaded napkin rings which I already had around each napkin.

I think the lighted candles against the white and silver elements makes for a very elegant display.  What do you think?
Thursday, November 15, 2012

MORE THAN LIPSTICK ON A PIG


You have probably heard the expression "you can put lipstick on a pig but it is still a pig".  A lot of people think that is what home stagers do with houses.  Not the case at all.  Home stagers don't just add decor items to what might be seen as a home in need of TLC.

If a home stager is called in, they will evaluate your house from the curb to the back yard.


  • Large shrubs obstructing the home may need to be trimmed back.

  • The front door may need a fresh coat of paint.

  • Decluttering of interior rooms is almost always needed.  

  • A home stager is likely to suggest old carpets be removed to show off the hardwood floors beneath.

  • They may suggest that bright paint colors be toned down. 

  • Maybe light fixtures need to be updated.  

  • Worn kitchen counters may need to be replaced, cabinets painted and hardware added or replaced.  

  • Anything that doesn't work or looks unsightly must be addressed.


It is not until the house is cleaned from top to bottom and everything on the "to do" list is completed does decor come into play.  A home stager can use your furniture and accessories to dress the house.  If you, however, lack the necessary pieces to complete the desired look, the home stager may provide a shopping list for you or you may be able to rent items from the home stager's own inventory.   A home stager will layout the furnishings in a room to allow for a spacious feel while directing the potential buyer through the home in a way that accentuates the positives.  All items recommended by a home stager are chosen for the purpose of aligning your home with the desires of your potential buyer.    If the buyer sees what they want and feels at home, they will choose your home over others they may have seen that didn't.

Home staging is more than putting lipstick on a pig.  Done right home staging adds the pearls too.  Pearls of wisdom that is.


Sunday, September 9, 2012

Make A Colorful Candle Trio Out Of Tin Cans

Weekends are for projects.  This particular weekend though I was feeling a bit lazy so my project had to be simple.  A while back I had seen pillar candle holders made out of what appeared to be tin cans on hautelook.com.

In anticipation of undertaking this project, I had saved one Bush's 28 oz. Baked Beans can and one 14 oz. vegetable can.  In order to have three cans of differing heights I would need one more.  I headed to my local supermarket and picked up a squat can of niblets corn.  The can was the perfect size for my project and the corn would go well with dinner.


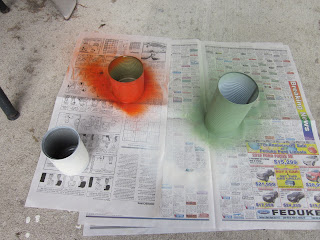
I pulled off the labels and washed the cans out thoroughly.  When they were dry I laid out some newspaper and pulled out some leftover cans of spray paint.  I chose green, orange and white to match my decor.  I gave each can two coats of paint.


After the cans were dry, I brought them in and placed them on my dining room table.  I then either inserted or topped each one with a cream, brown or maroon colored candle from my stock.


I think the final result makes for a colorful candle trio don't you?

Tuesday, August 21, 2012

Another Furniture Project

Enjoyed another busy weekend feeding my project obsession.  You see if
I don't complete some sort of project, I feel my weekend was wasted.       

This past weekend I decided to tackle the 3-drawer chest our neighbor gave us.  It had been sitting on the back porch for a while.


First I headed out to Lowes to pickup some stain and new knobs.  I purchased six 1.5 inch round wooden knobs and a quart of Sunbleached Rust-Oleum Wood Stain.


I went with plain wooden knobs since I planned on spray painting them green any way.


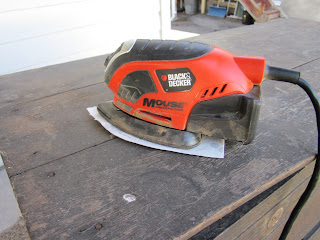
I then used my Black & Decker Mouse to sand down the existing finish.  Sadly my Mouse blew up before I could finish forcing me to finish sanding by hand.


This is what the dresser looked like after sanding.


I then applied the stain and topped it off with a coat of polyurethane.  I expected more of a gray like driftwood but ended up with more of a slate blue finish.


 Once I placed the dresser in my foyer though it actually looked good.  It picks up nicely on the color of the slate flooring in there.  The extra storage will be great and it is a handy place to lay down the mail too.


Sunday, August 12, 2012

Thrift Finds Transformed

Money has been tight of late so I had taken a break from hitting the yard sales and my favorite thrift and auction locales.  My addiction, however, could not be contained any longer.  Yesterday I headed out to check out some yard sales.  The weather was threatening though so I couldn't find as many as I would have liked.  That eventually led me to the next best thing, my local Salvation Army Thrift Store. 

At the first yard sale I stopped at I found this beautiful round end table for $5.00.  Well actually as you can see it wasn't really beautiful.  The shape and the simple danish modern lines totally caught my eye though.  The fact that it was made of solid wood and was sturdy sealed the deal.


I hunted high and low and found some stain I knew I had.  It was easy enough to find a sock with a hole in it to apply the stain.  On the first pass I forget to wear gloves so an SOS pad was needed to clean my hands when I was done.  As it was starting to get dark I let the table dry overnight.  This morning I sanded it a bit with fine sandpaper and applied a second coat of stain remembering to wear rubber gloves this time.  I gave the table some time to dry then I applied a coat of fast drying polyurethane using a paint sponge.


While I waited for the polyurethane to dry I decided to give the clear glass square-shaped vase I got for .49 cents at the Thrift Store a make-over of its own.


I turned the vase upside down on a newspaper and gave it two coats of Looking Glass Mirror spray paint.  The paint was leftover from a previous project.


If I do say so myself, I now have a stunning mirrored vase and an end table to die for.  Using leftover materials from other projects I only spent $5.49 to complete the two projects.  Note to self:  A hobby that allows me to flex my creative muscle and brings me so much joy can't be bad thing even if it is an addiction.

Sunday, May 27, 2012

Make your own Hanging Planters

The first year in my new house I bought hooks to screw into my front porch to hang planters from.    At a yard sale I found some wire hanging baskets.  I found ready-made planter pots at Lowes that fit in my baskets for that first year.  Last year and this though I used the old pots and filled them myself with my own plant selections.


You will need a bag of potting soil and some annuals to start.  I chose bright pink Begonia, and some lilac and white Impatiens.


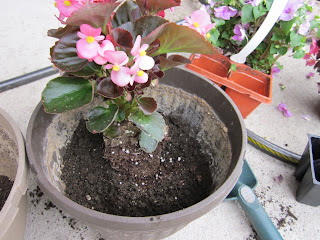
I filled the bottom with some soil and then I placed the Begonia in the center of the pot.


I then encircled the Begonia with two white and two pink Impatiens.


After filling in around the plants with more dirt and giving them a good watering the final product looked like this.


Sunday, April 8, 2012

Make A Simple But Elegant Brunch

Easter morning and I had all kinds of ideas for a fancy Easter Brunch.  One big problem though is I am not much of a morning person.   That being the case breakfast items don't usually come out as planned.

I decided maybe I could prepare something not from scratch but serve it up elegantly to make up for my lack of skill.


I pulled a box of mini pancakes from the freezer, a carton of Cool Whip from the refrigerator, a jug of maple syrup from the cabinet and a banana from my banana rack.
   
 
 I put the pancakes on a paper plate and microwaved them for 30 seconds.


Then I put the pancakes in a fancy dessert dish and sliced up a banana on top.


I poured on some maple syrup.


I plopped on some whip cream.


Finally, I served it up in the middle of a fancy table setting with a cup of coffee and some hard boiled eggs sitting in bird nests.   Take if from me your guests will think you slaved to make them this beautiful and yummy breakfast.  What would have made the dish even more tasty would have been some crumbled bacon on top.  Maybe next time.

To convert this dish into a scrumptious and different dessert throw in some vanilla ice cream before you plop on the whip cream.  For breakfast or dessert you could also experiment with fruit flavored syrups.   Everything store bought and ready made and your guests will never know the difference.

Saturday, March 24, 2012

Simple Spring Wreath


I was late this year in taking down my Christmas Wreath.  I kept waiting for winter but it never came.  I finally gave up and started to look forward to spring.  Rather than buy a ready-made wreath or use last years I decided to make one of my own.


My local craft store had all of the necessary materials.  I picked up a 12" floral craft ring made from MDF, a bag of Spanish moss, two faux floral branches and a clip-on feather tailed bird.  Total material cost was about $13.

If you would like to make your own, follow along with me.

I started off by using Elmer's Glue to adhere the moss around the entire ring.  I love the curly texture of the Spanish moss. 


While the glue dried, I pulled the flower petals off the ends of the branches and arranged them around the ring.  Once I liked the overall look, I used my glue gun to secure each flower in place. 


Lastly I clipped the bird to the top of the wreath with its feathered tail hanging down.   I think the yellow and red flowers really pop against the rusty red of my front door.  As far as I am concerned there is nothing more welcoming than a hand-made wreath.