Two years ago I purchased my current home. It is an 1890 colonial. The house appears to have been built in stages over the years. The front third is 2 1/2 stories with high ceilings on both levels and a walk-up attic space. The mid and rear sections are more of a 1 1/2 story.
The master bedroom is situated on the second floor of the mid section. It is a very large room with sloped ceilings. To enter from the hallway you need to step down. When I purchased the house there was no door to this room making it more appropriate for use as a family room. In order to convert the room for use as a bedroom adding a door was a must.
Herein is where the problems became apparent. First of all being sunken a regular hinged door would have just hung in mid air along the wall. With the door swinging into the room it either blocked the heat register on one wall or wouldn't swing all the way open because of the sloped ceiling. A pocket door wouldn't have worked for the same reason. Swinging the door out into the hallway would block the stairway or impede on the entrance to the other bedroom. So what was a person to do. I didn't want bi-fold doors which would have made it look like the entrance to a closet. I needed something special.
I decided a sliding barn door was the only answer. Looking into it further I found the standard barn door hardware to be relatively expensive. For a lower priced option I came up with hanging a sliding closet door track on the outside of the bedroom wall. I purchased a standard door slab at Lowes along with the closet door track and hardware. In order to secure the track to the wall at the right height I secured a two by four painted the color of the wall first. I then screwed the track into that and added the wheels to the top of the door. It is functional and I think it added some industrial interest without compromising anything. Wouldn't you agree?
Blog of home staging tips, decorating DIY projects, suggestions for re-purposing and re-using flea market and yard sale finds.
Thursday, March 8, 2012
Sunday, February 5, 2012
My Favorite Furniture Make-Overs
I love shopping flea markets, yard sales and auctions for great furniture pieces. This past summer I came across two great finds.
One was a chipped green painted chair with a stained fabric seat. I picked it up for $1 at a yard sale. I saw great potential here.
I painted it glossy black with a can of spray paint. Then with my husband's electric stapler I recovered the seat with animal print fabric I picked up at JoAnn's Fabrics. Now this beautiful Chippendale-style chair can sit with the best of them.
The second item was a mid-century modern night table I found at the Thrift Store. I think this cost me $5 and actually looked pretty good as it was.
Nonetheless, I decided to give it a little extra lift with a can of turquoise glossy spray paint. Now it is a real gem.
What is great about these older pieces is that they are made from real wood and not particle board. Of course, the price can't be beat either.
One was a chipped green painted chair with a stained fabric seat. I picked it up for $1 at a yard sale. I saw great potential here.
I painted it glossy black with a can of spray paint. Then with my husband's electric stapler I recovered the seat with animal print fabric I picked up at JoAnn's Fabrics. Now this beautiful Chippendale-style chair can sit with the best of them.
The second item was a mid-century modern night table I found at the Thrift Store. I think this cost me $5 and actually looked pretty good as it was.
Nonetheless, I decided to give it a little extra lift with a can of turquoise glossy spray paint. Now it is a real gem.
What is great about these older pieces is that they are made from real wood and not particle board. Of course, the price can't be beat either.
Friday, January 27, 2012
Make A Decorative Storage Rack With Repurposed Items
On my recent visit to the thrift store I looked around to see if there were any interesting items that I could make something with. I found a pine wooden crate for 99 cents, a 6" brass pillar candle ring for 99 cents, and a package of swag/scarf rings for 99 cents. I then headed to Kmart in hopes of finding round adhesive mirror stick-ons. I didn't find what I was looking for but came away with a 5" diameter round mirrored candle plate and two blind spot mirrors I found in the auto parts department.
Since the mirrored plate was 5" diameter and the candle ring opening was 6" diameter I cut a piece of cardboard box in a 6" round and glued the mirror onto it using my hot glue gun. I then glued the cardboard to the ring and the two spot mirrors onto the scarf rings.
After staining the wooden crate with some leftover walnut stain I glued the three mirrors onto the crate. The crate can now be hung on the wall or you can sit it on a shelf. I found it worked perfectly to hold my CDs. Thinking outside the box (no pun intended) I was able to make a one-of-a-kind decorative CD rack for about $10.
I would love to see what other creative types have made by repurposing found items. Please feel free to share your projects.
Since the mirrored plate was 5" diameter and the candle ring opening was 6" diameter I cut a piece of cardboard box in a 6" round and glued the mirror onto it using my hot glue gun. I then glued the cardboard to the ring and the two spot mirrors onto the scarf rings.
After staining the wooden crate with some leftover walnut stain I glued the three mirrors onto the crate. The crate can now be hung on the wall or you can sit it on a shelf. I found it worked perfectly to hold my CDs. Thinking outside the box (no pun intended) I was able to make a one-of-a-kind decorative CD rack for about $10.
I would love to see what other creative types have made by repurposing found items. Please feel free to share your projects.
Wednesday, January 18, 2012
How to Spice Up Bland Curtains
With the dreariness of winter upon us I decided to spice up my bland curtains. I took the plain black curtain panel in my guest bath/laundry room and added black and white ribbon adorned with yellow buttons to the center of the curtain. I attached the ribbon with velcro and the ribbon now serves to shorten the too long curtains as well.
A while back I made valances for my kitchen windows out of old sheets and fusible web since sewing isn't my thing. To give them an update and tie in the color of my new antique kitchen cupboard I used a stencil and some green acrylic paint to create a vertical striped design along each valance.
Just these minor changes made such a difference. Now my curtains are bright and cheery.
A while back I made valances for my kitchen windows out of old sheets and fusible web since sewing isn't my thing. To give them an update and tie in the color of my new antique kitchen cupboard I used a stencil and some green acrylic paint to create a vertical striped design along each valance.
Just these minor changes made such a difference. Now my curtains are bright and cheery.
Sunday, January 8, 2012
High End Look for Less
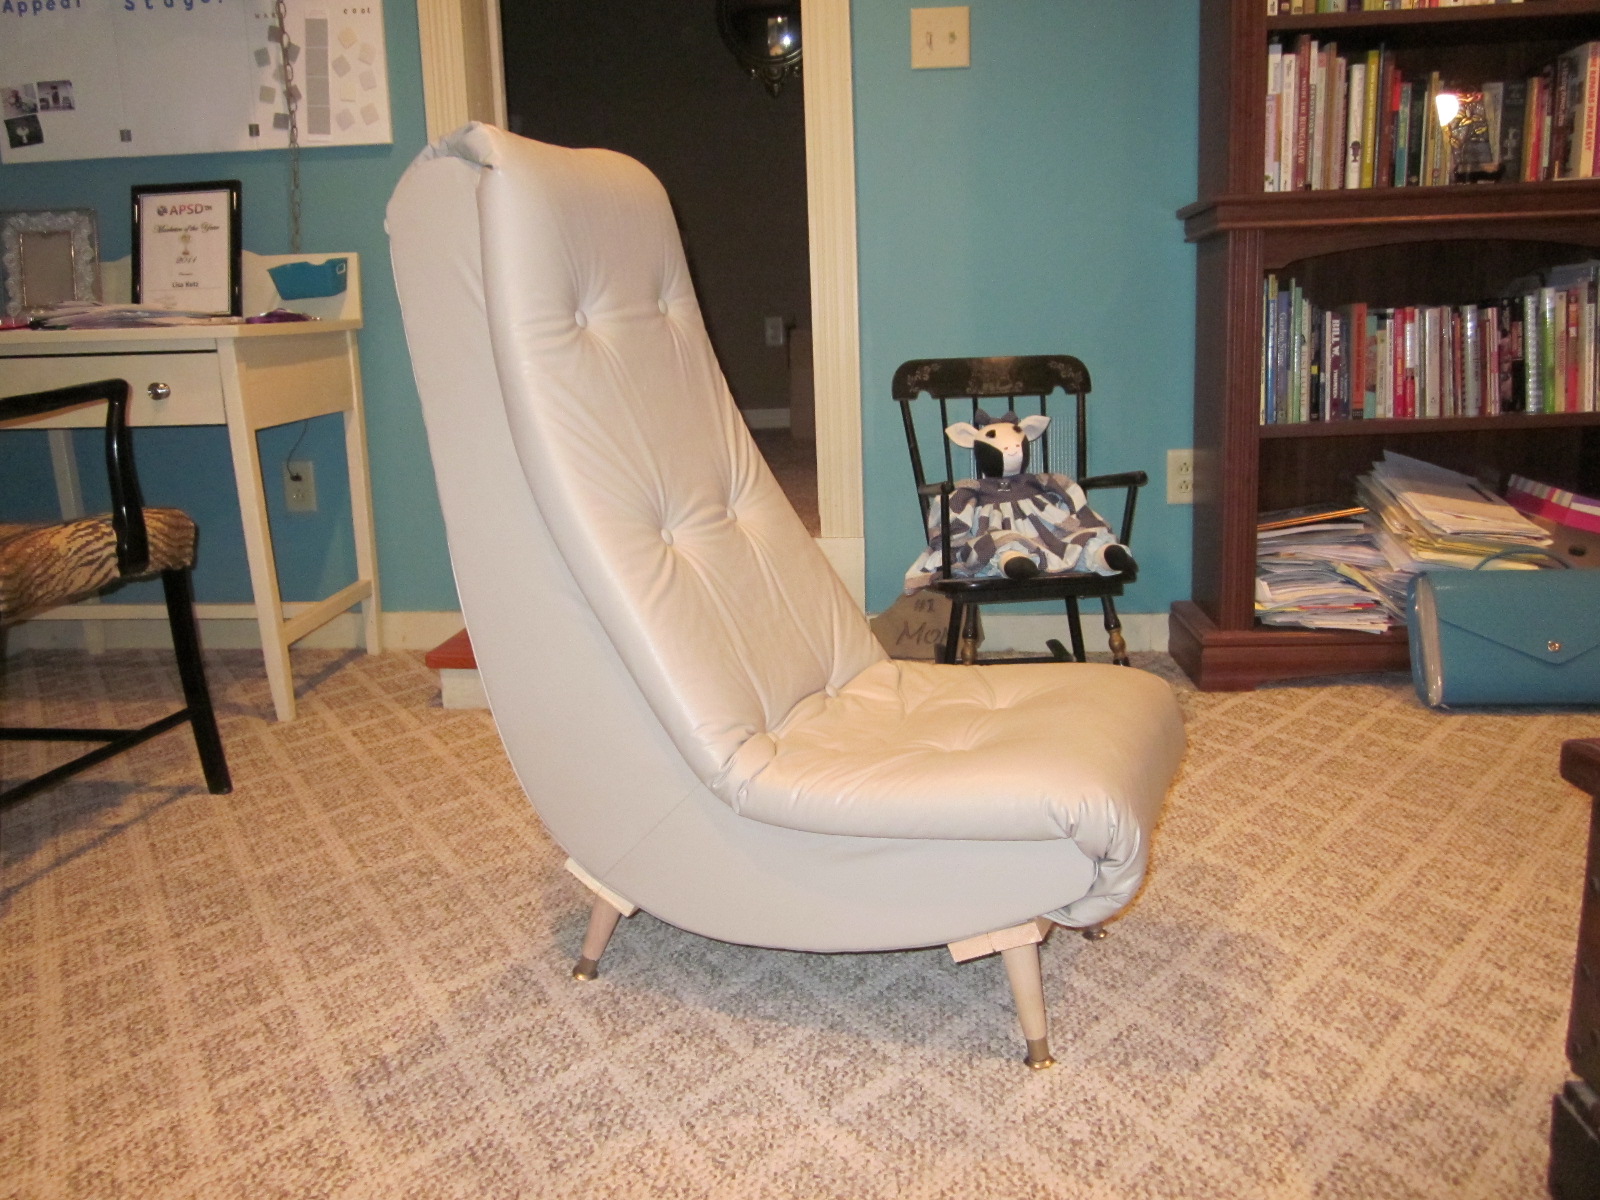
I felt the need to work my creative side today. A couple of months ago I purchased a video rocker at my Salvation Army Thrift Store for $10 or $15.
My plan was to recreate the look of a mid century modern lounge chair. Below is an example of a 1960's lounge chair I found on One Kings Lane. A pair of these were going for $3,999.
With the holidays and all I didn't get around to my planned project until now. This morning I headed out to Lowes for four Round Tapered Legs and four Angled Top Plates. They only carried 6" or 24" legs in this modern style. I was really looking for more of a 10-12" leg but decided I could work with the shorter leg for now. Each one cost $2.50 and the plates were $1.68 each.
In order to provide a sturdier base to adhere the legs to I decided to use a 1 x 4 board I had in my garage. I cut two lengths the width of the base of the chair (16") and screwed two plates to each board. I then screwed the legs into the plates and screwed the boards to the bottom of the chair.
Below is what I ended up with. I think it looks pretty close to the expensive chair above. What do you think?
My plan was to recreate the look of a mid century modern lounge chair. Below is an example of a 1960's lounge chair I found on One Kings Lane. A pair of these were going for $3,999.
With the holidays and all I didn't get around to my planned project until now. This morning I headed out to Lowes for four Round Tapered Legs and four Angled Top Plates. They only carried 6" or 24" legs in this modern style. I was really looking for more of a 10-12" leg but decided I could work with the shorter leg for now. Each one cost $2.50 and the plates were $1.68 each.
In order to provide a sturdier base to adhere the legs to I decided to use a 1 x 4 board I had in my garage. I cut two lengths the width of the base of the chair (16") and screwed two plates to each board. I then screwed the legs into the plates and screwed the boards to the bottom of the chair.
Below is what I ended up with. I think it looks pretty close to the expensive chair above. What do you think?
Saturday, December 31, 2011
New Year's Resolution
It is that time again. Each year it seems to come faster. The New Year is upon us. A time to reflect on past events and plan for the future.
This past year found me earnestly working to grow my Home Staging business here in Broome County, New York. I started off the year with a small ad in the For Sale by Owner and Realtor Magazine and now write a monthly column.
In March I sponsored a booth at the Greater Binghamton Association of Realtors Agents Day.
In June I traveled to Denver, Colorado to attend STAGE, a training event offered by the Association of Property Scene Designers. I spent three days networking and learning the ins and outs of the business from stagers who came from across the United States and Canada. I made many lasting friendships and continue to nurture them through social media sites.
2011 was a tough year economically for many. My local area has been slow to embrace the concept of Home Staging. However, 2012 will be the year I redouble my efforts to share the benefits of Home Staging with my neighbors. You only need look at the statistics to know that Staging is worthwhile and something sure to catch on given time.
SEE YOU ALL NEXT YEAR.
This past year found me earnestly working to grow my Home Staging business here in Broome County, New York. I started off the year with a small ad in the For Sale by Owner and Realtor Magazine and now write a monthly column.
In March I sponsored a booth at the Greater Binghamton Association of Realtors Agents Day.
In June I traveled to Denver, Colorado to attend STAGE, a training event offered by the Association of Property Scene Designers. I spent three days networking and learning the ins and outs of the business from stagers who came from across the United States and Canada. I made many lasting friendships and continue to nurture them through social media sites.
Me and Karen Schaefer, Founder of APSD
2011 was a tough year economically for many. My local area has been slow to embrace the concept of Home Staging. However, 2012 will be the year I redouble my efforts to share the benefits of Home Staging with my neighbors. You only need look at the statistics to know that Staging is worthwhile and something sure to catch on given time.
SEE YOU ALL NEXT YEAR.
Thursday, December 8, 2011
Embellishing for the Holidays
Getting ready for the holidays and thought I would add some more glitz and glam to the occasion. I looked around to see what I might have that I could improve upon.
I took a yard sale wreath I found over the summer and clamped on a big glittery floral bow, two red birds and stuck in a couple of foliage and gold ornament picks.
Here it is adorning my front door to welcome guests.
I recently came across a bag of a dozen green wooden napkins rings for $.99 at the Salvation Army Thrift Store. To dress them up I applied a 2 inch glitter snowflake ornament to each with my glue gun. I also added clear self-adhesive gems I found at the craft store.
I took a yard sale wreath I found over the summer and clamped on a big glittery floral bow, two red birds and stuck in a couple of foliage and gold ornament picks.
Here it is adorning my front door to welcome guests.
I recently came across a bag of a dozen green wooden napkins rings for $.99 at the Salvation Army Thrift Store. To dress them up I applied a 2 inch glitter snowflake ornament to each with my glue gun. I also added clear self-adhesive gems I found at the craft store.
These will be the perfect addition to my holiday table.
If you have done any home decor shopping recently, you know mercury glass is big. A colleague of mine told me about a product called Looking Glass from Krylon. I found it in the craft store in the art glass section. I took a basic glass hurricane vase I purchased at Walmart and glued a pedestal candle holder to the bottom to give it more height. I spray painted the inside of the vase with several light coats of the mirror finish as directed.
After it dried thoroughly I placed a pillar candle inside. The flame dances and glows beautifully from within and it too will be a great addition to my holiday table.
Labels:
birds,
bows,
candle holder,
embellishments,
glitter,
holidays,
hurricane vase,
Krylon Looking Glass,
mercury glass,
napkin rings,
ornament picks,
pedestal,
self-adhesive gems,
snowflakes,
Wreath
Subscribe to:
Posts (Atom)